Campaign
The Campaign at Gully Ravine
In early planning for the Gallipoli campaign, a landing at Gully Beach, also known as Y2 Beach, was considered, but it was believed that it was well defended by elements of the Turkish 9th Division, so the plan was scrapped. In fact, there was only a small picket force there, and this fled when the landings of 25th April began to make headway inland.
Gully Beach was first reached by allied troops on 28th April 1915. The size and extent of the ravine behind it clearly came as something of a surprise. As the official history of the 29th Division indicates, ‘it was a formidable military obstacle.’
Ironically, the landing at Y Beach on 25th April meant that the troops were already well over half-
The presence of Gully Ravine was however also an opportunity. The gully has numerous offshoots to either side, rather like twigs on a branch, and the stream bed follows a course that brings it within about a kilometre of the village of Krithia (modern Alcitepe). This was one of the allies’ objectives.
The side gullies were quickly utilised as the front line extended forward. Everything from field dressing stations, food and ammunition dumps, stables, brigade HQs and even a practice shooting range were established. Communications trenches and roads were built linking the gully to either spur, giving the impression on an overhead map of a gnarled tree, with Gully Ravine being the trunk, and the radiating trenches on either side the winter-
Krithia, mentioned below, and at the time a Greek community village, gives it name to the battles in the general area. It is now known as Alcitepe. The allies never took it, although shelling reduced it to ruins.
Whilst the sections below mainly refer to specific battles, it will be appreciated that conflict was continuous at some level from the time of the occupation of the ravine in late April 1915 to its evacuation in early January 1916. After the Suvla landings in early August, the Helles sector and Gully Ravine in particular is rather ignored in popular accounts. However, individual regimental histories, and Ray Westlake’s superb book ‘British Regiments at Gallipoli’*, make clear that this sector was far from abandoned or unoccupied in the latter parts of the campaign.
* British regiments at Gallipoli. Ray Westlake. Leo Cooper, Imprint of Pen and Sword Ltd. 1996. ISBN: 08505251
The First Battle of Krithia
The first battle of Krithia, on 28th April 1915, was essentially an extension of the landings. Advancing troops, including the 1/Border Regiment and 1/Inniskilling Fusiliers reached Gully Beach and pushed up the ravine, but these and other forces, such as the 2/SWB in reserve, were already reduced, battered and exhausted by the landings. Turkish guns on the spurs took an early toll, and by nightfall, the advance had stalled as soldiers, bereft of orders and water and barely able to stand through exhaustion, simply dug in or retreated.
This action was part of an advance across the whole peninsula. It called for a complex ‘right hook’ in which the entire force was to turn east to face the Dardanelles straits. It is doubtful whether the nuances of this plan ever made it through to the soldiers on the ground. Artillery support was a fraction of what it should have been. Starting from different points, brigades across the peninsula were soon halted by enfilade fire.
The Turkish counter-
The Second Battle of Krithia
The pressure was on due to the constantly arriving Turkish reinforcements and the developing trench system beyond no man’s land, so a further concerted attack was planned for 6th May. The objectives were the capture of Krithia and Achi Baba hill beyond. Elements of Australian and New Zealand forces were involved, having been moved to the Helles area from Anzac.
Advances were made through the gully and on both spurs, but by this time the Turkish were well-entrenched, and the toll in dead and wounded was huge. The woodland on Fir Tree spur, (ironically carpeted with poppies) became a killing ground, and hundreds of British and ANZAC troops died and were wounded in the advance, which secured just a few hundred metres. Here the ANZAC troops of the 2nd Australian Infantry Brigade who had been hurriedly ferried to Helles to join the battle, won the accolade of ‘The White Gurkhas’ for their remarkable advance along the Krithia Spur, establishing the Redoubt Line about 600 metres south of The Vineyard.
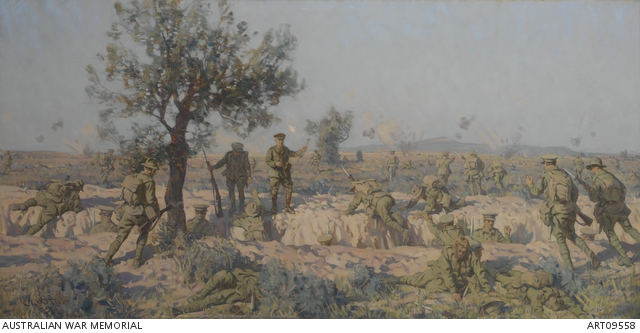
Charles Wheeler’s ‘Charge of the 2nd Infantry Brigade at Krithia’. This depicts the scene at ‘Tommies Trench’
on Krithia Spur in the late afternoon of 8 May 1915.
The 2nd are urged forward from the trench by Brigade Commander General McCay (shown with raised swagger stick to the right of the tree).
Achi Baba hill is shown in the distance. Image now in public domain, copyright expired.
On Gully Spur, to the left of the ravine, a Turkish strong point above the abandoned Y Beach was causing mayhem. On 11th May, 86th Brigade were relieved by the 29th Indian Brigade, and on the rainy day of 12th May 1915, Gurkha and Punjabi forces, supported by shelling from capital ships offshore, over-
Consolidation took place over the next week, and communications routes, telephone lines, supply dumps and all the other paraphernalia of trench warfare were put in place.
On 25th May a huge rainstorm occurred, flooding the gully and the trenches up on the spurs, a reminder that in spite of the tenuous hold that men had on the land, nature still reigned supreme.
The Third Battle of Krithia
By early May, a system of identifying the facing Turkish trenches had been established. On the left of Gully Ravine on Gully Spur, the trenches were designate ‘J’ and those on Fir Tree Spur to the right as ‘H’. An attack involving some 30,000 men was planned for 4th June, and artillery, whilst still rather wanting, was certainly more coherent. A bombardment of the Turkish lines began at 8am and ceased at 10.30am, to begin again at 11am for 20 minutes, in a plan to lure Turkish soldiers back into the trenches in the lull. A further ruse of this kind followed. At 12 noon the infantry went over the top, and the Lancashires & Indian Brigades, amongst others, ran in to a hail of lead which cut them to pieces. Some advances were made, but in a macabre echo of previous battles, lack of adequate artillery support and reserve troops and the fixated staff demands to ‘keep the line straight’ meant that sections of bitterly-
The Battle of Gully Ravine
On 21st June 1915 the French forces, to the right of the British line, made some advances in their sector around the Kereves Dere, and Sir Ian Hamilton determined to capitalise on this with a further push through Gully Ravine and on the spurs to either side. An advance was planned for Monday 28th June 1915.
On the left, the Indian Brigades were in charge, with 86th and 87th Brigades on Gully Spur. In the Gully itself, 1/Border Regiment was to advance, and on Fir Tree Spur, newly arrived elements of the 156th Brigade were supported by 88th Brigade in reserve. Mistakes were made from the outset. Because the left flank was considered the tougher option, artillery support on the right was proportionally lacking, with very few high explosive shells available. In fact a mere 12000 rounds in total were allocated for the battle, and only about half the field guns generally considered adequate for the force sent in.
After almost 2 hours of artillery bombardment, the 1st Border Regiment went forward on Fir Tree Spur against a Turkish machine gun post and trench system known as ‘the Boomerang’, named after a nearby curved trench. The redoubt was taken, but the neighbouring ‘Turkey Trench’ proved much harder. The following waves of the 156th Brigade were cut down by hitherto unknown Turkish machine guns dug in at the further ‘H’ trenches.
Over on Gully Spur, progress was swifter, albeit not without significant losses, and no less than five Turkish ‘J’ trenches were taken. Fighting continued until early July, and after consolidation, the allies had advanced about a kilometre on the left and 500 metres on the right. In Gully Ravine itself, a new front line had been established, named ‘Border Barricade’ after the 1/Border regiment who took it.
The battle of Gully Ravine marked the allies’ furthest significant advance at Helles, and cost some 3800 lives, half of these from amongst the new and inexperienced 156th Brigade on Fir Tree Spur. The Turkish admitted to losing some 14,000 men dead, 10,000 on 28th June alone.
The later campaign in and around the gully
In July and particularly in early August, the whole Helles front was focused on providing ‘diversions’ for the further pushes at Anzac, which was now seen as the most likely area for a break-
The allied line was now hugely unbalanced, almost an inverted ‘L’ shape, with the gains on Gully Spur –
As autumn came, with the continued expectations of the Suvla front drawing the main focus, consolidation and retention of existing gains became the priority. The political scene has shifted too, and Gallipoli was no longer favoured as the new front. Resources such as shells were retained in the Helles sector at a level just sufficient to maintain the line, and demand for troops in the new Salonika campaign drew reinforcements away from Gallipoli.
Whilst the huge storm in November is remembered principally for its devastating affect on the troops at Suvla Bay, the Anzac and Helles areas suffered almost as much, and by now the conflict was reduced to sporadic fire fights and sniping. After Kitchener’s visit the rumours of evacuation were confirmed, and across the whole peninsula in Mid December, the allies began a slow and ‘invisible’ withdrawal which was arguably the best planned manoeuvre of the whole Gallipoli campaign. Every living man was evacuated successfully, the last leaving the Helles sector on 9 Jaunary 1916.